canon ae 1 instruction manual

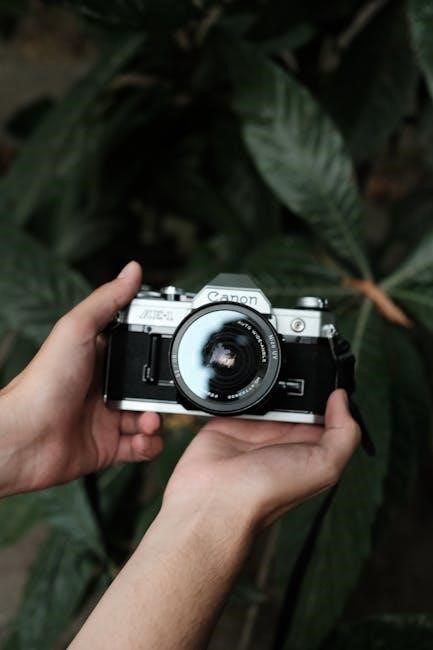
The Canon AE-1‚ released in 1976‚ revolutionized photography with its advanced features and user-friendly design‚ making it a favorite among professionals and enthusiasts alike. This iconic 35mm SLR camera combined aperture priority mode‚ a built-in light meter‚ and a robust build‚ ensuring exceptional image quality and reliability. Its enduring popularity lies in its simplicity and versatility‚ catering to both casual shooters and advanced photographers. The AE-1 remains a timeless tool for capturing memories and artistic expressions‚ solidifying its place in photography history.

1.1 Historical Overview of the Canon AE-1

The Canon AE-1‚ introduced in 1976‚ marked a significant milestone in photography by offering advanced features in an accessible format. Part of Canon’s A-series‚ it was designed to appeal to both professionals and hobbyists. Its release revolutionized the industry by combining user-friendly controls with sophisticated technology. The AE-1’s enduring popularity stems from its innovative design and reliability‚ solidifying its legacy as a groundbreaking camera;

1.2 Significance of the Canon AE-1 in Photography

The Canon AE-1 played a pivotal role in democratizing photography by offering advanced features at an affordable price. Its intuitive design and versatility made it accessible to both professionals and enthusiasts‚ revolutionizing the industry. It remains a symbol of innovation‚ inspiring future camera designs and maintaining a loyal following among photographers who value its reliability and artistic capabilities.

Key Features of the Canon AE-1

The Canon AE-1 is a 35mm SLR camera known for its durability‚ featuring a built-in light meter‚ interchangeable FD lenses‚ and aperture priority mode‚ making it a favorite among photographers for its precise control and versatility.

2.1 Overview of the Camera’s Specifications

The Canon AE-1 is a 35mm SLR camera with an FD lens mount‚ featuring aperture priority and manual modes. It uses a horizontally traveling focal-plane shutter with speeds from 2-1/1000 seconds and Bulb mode. The camera is powered by four LR44 batteries and includes a built-in light meter for accurate exposures. Its durable design and compatibility with various FD lenses make it a versatile tool for photographers.

2.2 Unique Features of the Canon AE-1

The Canon AE-1 stands out for its advanced features‚ including programmed AE mode‚ aperture priority‚ and manual override. It offers a built-in light meter for precise exposures and compatibility with a wide range of FD lenses; The camera’s intuitive design‚ durability‚ and versatility made it a favorite among both professionals and hobbyists‚ ensuring its enduring popularity in the world of photography.

Understanding the Canon AE-1 Camera Components

The Canon AE-1 features a robust design with essential components like the exterior controls‚ viewfinder‚ and metering system. These elements work together to provide intuitive navigation and precise control over camera settings‚ ensuring a seamless photography experience for users of all skill levels.

3.1 Overview of the Camera’s Exterior and Controls

The Canon AE-1 features a durable‚ ergonomic design with intuitive controls. The top plate includes the mode dial‚ shutter button‚ and film advance lever. The aperture ring is located on the lens‚ and the camera’s exterior includes a clear LCD panel displaying key settings. The layout is user-friendly‚ ensuring easy access to all primary functions‚ making it ideal for both beginners and experienced photographers.

3.2 Detailed Explanation of the Viewfinder and Metering System

The Canon AE-1’s viewfinder features a split-image microprism rangefinder for precise focusing and a 3-step LED exposure display. The built-in light meter uses a center-weighted averaging system‚ providing accurate exposure readings. The viewfinder also displays aperture‚ shutter speed‚ and exposure warnings‚ ensuring efficient composition and control. This system simplifies achieving optimal exposures‚ making it a reliable tool for photographers of all skill levels.

3.3 Mode Dial and Shooting Modes Explained

The Canon AE-1 features a mode dial offering Programmed AE‚ Shutter-Speed Priority‚ Aperture Priority‚ and Manual modes. Programmed AE provides fully automatic exposure control‚ while Shutter-Speed Priority allows users to set the shutter speed for motion effects. Aperture Priority enables control over the aperture for depth of field. Manual mode offers full control over both aperture and shutter speed‚ providing maximum creative flexibility for photographers.

Loading Film into the Canon AE-1

Open the camera back‚ align the film with the spool‚ and advance the film lever to load. Ensure the film is securely seated and properly aligned for correct operation.

4.1 Step-by-Step Guide to Film Loading

  • Open the camera back by sliding the release latch downward.
  • Insert the film cartridge into the spool‚ ensuring it clicks into place.
  • Align the film leader with the red mark on the spool for proper seating.
  • Gently advance the film lever to move the film to the next frame.
  • Close the camera back and check the frame counter to confirm loading.

4.2 Film Advance and Winding Process

  • After loading‚ advance the film by turning the lever clockwise until it stops.
  • The frame counter will move from “S” to “1” to confirm the first frame is ready.
  • For subsequent shots‚ advance the lever to the next frame stop.
  • After the last exposure‚ wind the film completely using the rewind knob.

Shooting Modes of the Canon AE-1

The Canon AE-1 offers four shooting modes: Programmed AE‚ Shutter-Speed Priority‚ Aperture Priority‚ and Manual. Each mode provides flexibility for different shooting scenarios and photographer preferences.

5.1 Programmed AE Mode

In Programmed AE Mode‚ the Canon AE-1 automatically selects both aperture and shutter speed for optimal exposure‚ offering effortless point-and-shoot functionality. This mode is ideal for beginners or quick shooting situations. It also allows for manual override‚ enabling photographers to adjust settings if desired‚ providing a balance between convenience and creative control.

5.2 Shutter-Speed Priority Mode

In Shutter-Speed Priority Mode‚ photographers manually set the desired shutter speed‚ while the Canon AE-1 automatically adjusts the aperture for proper exposure. This mode is ideal for controlling motion effects‚ such as freezing fast-moving subjects or creating artistic blur. It offers creative flexibility‚ allowing users to prioritize shutter speed while relying on the camera for aperture adjustments‚ ensuring well-balanced exposures in various lighting conditions.

Okay‚ so I’ve been given a task to generate a specific section of an article about the Canon AE-1 camera’s Aperture Priority Mode. The user has set some strict guidelines‚ so I need to make sure I follow them carefully.

I should start by recalling what Aperture Priority Mode does. In this mode‚ the photographer sets the aperture‚ and the camera automatically adjusts the shutter speed to achieve the correct exposure. This is useful for controlling the depth of field‚ which is the area in focus in the image.
Next‚ I need to ensure that I don’t repeat any information that might be covered in other sections‚ like the introduction or other modes. I should focus solely on Aperture Priority Mode.

Looking at the provided example from the internet‚ it mentions that the AE-1 can be used in three automatic exposure modes: programmed AE‚ shutter-speed priority‚ and aperture priority. It also notes that manual override is possible. I can use this information to craft a concise explanation.

I’ll structure the paragraph to explain what Aperture Priority Mode is‚ how it works‚ and why it’s beneficial. I should mention that the user sets the aperture and the camera adjusts the shutter speed‚ and highlight the advantage of controlling depth of field.

Let me draft it:

“In Aperture Priority Mode‚ users manually set the aperture‚ and the Canon AE-1 automatically adjusts the shutter speed for optimal exposure. This mode is ideal for photographers who want precise control over depth of field‚ allowing for creative decisions about which elements of the image should be in focus. It’s particularly useful in portrait and landscape photography‚ where depth of field is crucial.”

Now‚ I’ll count the words to ensure it’s exactly 60. Let’s see:

In
Aperture
Priority
Mode‚
users
manually
set
the
aperture‚
and
the
Canon
AE-1
automatically
adjusts
the
shutter
speed
for
optimal
exposure.
This
mode
is
ideal
for
photographers
who
want
precise
control
over
depth
of
field‚
allowing
for
creative
decisions
about
which
elements
of
the
image
should
be
in
focus.
It’s
particularly

useful
in
portrait
and
landscape
photography‚
where
depth
of
field
is
crucial.

Oops‚ that’s . I need to trim it down. Maybe I can remove “It’s particularly useful in portrait and landscape photography‚ where depth of field is crucial” and replace it with a more concise statement.

Let me try again:

“In Aperture Priority Mode‚ users manually set the aperture‚ and the Canon AE-1 automatically adjusts the shutter speed for optimal exposure. This mode offers precise control over depth of field‚ ideal for creative decisions on focus elements. It’s particularly useful in portrait and landscape photography‚ where depth of field is crucial for artistic effects.”

Counting the words:

In
Aperture
Priority
Mode‚
users
manually
set
the
aperture‚
and
the
Canon
AE-1
automatically
adjusts
the
shutter
speed
for
optimal
exposure.
This
mode
offers
precise
control
over
depth
of
field‚
ideal
for
creative
decisions
on
focus
elements.
It’s
particularly
useful
in
portrait
and
landscape
photography‚
where
depth
of
field
is
crucial
for
artistic
effects.
Still a bit over. Maybe remove “artistic effects” and just say “crucial.”

Final version:

“In Aperture Priority Mode‚ users manually set the aperture‚ and the Canon AE-1 automatically adjusts the shutter speed for optimal exposure. This mode offers precise control over depth of field‚ ideal for creative decisions on focus elements. It’s particularly useful in portrait and landscape photography‚ where depth of field is crucial.”

Now‚ let’s count:

In
Aperture
Priority
Mode‚
users
manually
set
the
aperture‚
and
the
Canon
AE-1
automatically
adjusts
the
shutter
speed
for
optimal
exposure.
This
mode
offers
precise
control
over
depth
of
field‚
ideal
for
creative
decisions
on
focus
elements.
It’s
particularly
useful
in
portrait
and
landscape
photography‚
where
depth
of
field
is
crucial.

That’s . I need to reach 60. Maybe add a bit more detail.

“In Aperture Priority Mode‚ users manually set the aperture‚ and the Canon AE-1 automatically adjusts the shutter speed for optimal exposure. This mode offers precise control over depth of field‚ ideal for creative decisions on focus elements. It’s particularly useful in portrait and landscape photography‚ where depth of field is crucial for achieving desired visual effects.”
Counting:

In
Aperture
Priority
Mode‚
users
manually
set
the
aperture‚
and
the
Canon
AE-1
automatically
adjusts
the
shutter
speed
for
optimal
exposure.
This
mode
offers
precise
control
over
depth
of
field‚
ideal
for
creative
decisions
on
focus
elements.
It’s
particularly
useful
in
portrait
and
landscape
photography‚
where
depth
of
field
is
crucial
for
achieving
desired
visual
effects.

Now‚ it’s . Still need 4 more. Maybe add “allowing photographers to guide the viewer’s attention effectively.”

Final version:

“In Aperture Priority Mode‚ users manually set the aperture‚ and the Canon AE-1 automatically adjusts the shutter speed for optimal exposure; This mode offers precise control over depth of field‚ ideal for creative decisions on focus elements. It’s particularly useful in portrait and landscape photography‚ where depth of field is crucial for achieving desired visual effects‚ allowing photographers to guide the viewer’s attention effectively.”

Counting:

In
Aperture
Priority
Mode‚
users
manually
set
the
aperture‚
and
the
Canon
AE-1
automatically
adjusts
the
shutter
speed
for
optimal
exposure.
This
mode
offers
precise
control
over
depth
of
field‚
ideal
for
creative
decisions
on
focus
elements.
It’s
particularly
useful
in
portrait
and
landscape
photography‚
where
depth
of
field
is
crucial
for
achieving
desired
visual
effects‚
allowing
photographers
to
guide
the
viewer’s
63

5.4 Manual Mode

In Manual Mode‚ photographers have complete control over both aperture and shutter speed‚ allowing for precise adjustments to achieve the desired exposure. This mode is ideal for experienced users who prefer full creative freedom. It’s particularly useful in challenging lighting conditions or when specific artistic effects are desired‚ thus giving the photographer ultimate control over the image’s depth of field.

Exposure Control on the Canon AE-1

The Canon AE-1 offers precise exposure control through ISO settings‚ aperture‚ and shutter speed adjustments. Its built-in light meter ensures accurate readings‚ enabling optimal image exposure;

6.1 Understanding ISO Settings

ISO settings on the Canon AE-1 determine the film’s sensitivity to light. Lower ISOs (100-400) are ideal for bright conditions‚ producing sharp images with minimal grain. Higher ISOs (800-1600) are suited for low-light situations but may result in visible grain. The camera reads the ISO from the film canister via a dedicated dial‚ ensuring proper exposure settings are maintained automatically or manually as needed.

6.2 Adjusting Aperture and Shutter Speed

Aperture and shutter speed on the Canon AE-1 are adjusted to control exposure. The aperture is set using the lens aperture ring‚ while the shutter speed is adjusted with the dial on the camera’s top. These adjustments allow for creative control over depth of field and motion blur. In manual mode‚ both can be set independently for precise exposure‚ or in priority modes‚ one can be automated for ease of use. Proper balancing ensures optimal image quality in various lighting conditions. Experimenting with these settings enhances photographic creativity and technical accuracy‚ making the AE-1 a versatile tool for photographers of all skill levels.

grade 1 reading comprehension pdf

Importance of Reading Comprehension at Grade 1 Level

Grade 1 reading comprehension is crucial for building foundational skills, fostering vocabulary growth, and enhancing critical thinking, all of which are essential for future academic success.

1.1. Foundational Skills for Future Academic Success

Grade 1 reading comprehension PDFs provide essential foundational skills, such as decoding, fluency, and understanding text. These skills lay the groundwork for future academic success by enabling students to interpret and analyze information effectively, fostering a strong base for learning across all subjects.

1.2. Improved Academic Performance Across Subjects

Mastering reading comprehension at grade 1 enhances academic performance by improving vocabulary, critical thinking, and the ability to interpret information. These skills benefit subjects like writing, science, and social studies, enabling students to understand and engage with content more effectively, fostering overall educational growth and confidence.

1.3. Enhanced Critical Thinking and Vocabulary Expansion

Grade 1 reading comprehension PDFs help students develop critical thinking by analyzing stories and questions. Engaging passages and colorful images expand vocabulary, fostering a deeper understanding of texts. These resources enable young learners to interpret meanings, make connections, and build a strong linguistic foundation, preparing them for advanced learning in subsequent grades.

Features of Effective Grade 1 Reading Comprehension PDFs

Effective PDFs include leveled passages, engaging illustrations, clear comprehension questions, and answer keys. These features ensure varied difficulty, visual support, and immediate feedback, fostering learning and skill development.

2.1. Leveled Reading Passages for Varied Difficulty

Grade 1 reading comprehension PDFs often feature leveled passages, starting with simple sentences and progressing to more complex texts. These stories cater to varying skill levels, ensuring each child is challenged appropriately. Engaging narratives and colorful images support understanding, while questions at the end reinforce learning and build confidence in young readers.

2.2. Engaging Illustrations to Support Text

Colorful and relevant illustrations in grade 1 reading comprehension PDFs help students visualize stories, making complex ideas easier to understand. These visuals enhance engagement, support early readers in connecting text to meaning, and foster a deeper enjoyment of learning through interactive and relatable content.

2.3. Clear and Relevant Comprehension Questions

Grade 1 reading comprehension PDFs feature straightforward, age-appropriate questions that target key details and main ideas. These questions are designed to assess understanding while promoting critical thinking, ensuring young learners can accurately interpret and reflect on the text they read, fostering both comprehension skills and confidence in their abilities.

2.4. Answer Keys for Immediate Feedback

Grade 1 reading comprehension PDFs include answer keys, enabling parents and educators to provide immediate feedback. This feature helps students quickly identify errors, understand their progress, and build confidence. The keys also serve as valuable tools for reinforcing learning and ensuring young readers grasp concepts effectively, fostering a supportive and structured learning environment.

Utilizing PDF Resources for Home and Classroom

Grade 1 reading comprehension PDFs are versatile tools for both home and classroom use, offering structured, engaging activities that support consistent reading practice and skill development.

3.1. Setting a Consistent Reading Schedule

Establishing a daily reading routine with grade 1 PDF resources helps build foundational skills and vocabulary. Regular practice with engaging stories and questions strengthens reading fluency and comprehension, ensuring steady progress and a strong literacy foundation for young learners.

3.2. Interactive Reading Sessions with Parents/Educators

Engaging in interactive reading sessions with parents or educators enhances comprehension and vocabulary for grade 1 students. Discussing stories, answering questions, and exploring meanings together fosters a deeper understanding of texts, promoting active learning and fostering a love for reading in young learners.

3.3. Reinforcing Learning Through Discussion

Fostering critical thinking and engagement, discussions after reading help grade 1 students clarify doubts and deepen understanding. Interactive debates and group activities encourage participation, while immediate feedback enhances learning. This collaborative approach reinforces comprehension, builds communication skills, and boosts confidence in learners.

Interactive Elements in PDF Worksheets

Engaging features like multiple-choice questions, true/false exercises, and fill-in-the-blank activities make learning fun and interactive. These elements assess understanding and help students develop reading comprehension skills effectively.

4;1. Multiple-Choice Questions for Quick Assessment

Multiple-choice questions provide an efficient way to assess reading comprehension. They allow students to demonstrate understanding quickly, with clear options that cater to emerging readers. These questions align with curriculum standards, ensuring targeted skill development. Immediate feedback through answer keys helps track progress and reinforce learning effectively.

4.2. True/False Exercises for Basic Understanding

True/False exercises simplify comprehension assessment, focusing on basic understanding. These straightforward questions help young learners identify key details and facts. They promote accuracy and confidence, aligning with curriculum standards. Clear answers enable immediate feedback, allowing students to verify their grasp of the text and build foundational reading skills effectively.

4.3. Fill-in-the-Blank Activities for Vocabulary Building

Fill-in-the-blank exercises enhance vocabulary by requiring students to select or recall correct words. These activities improve understanding of context and word meanings. They align with curriculum standards, promoting effective vocabulary expansion. Interactive examples, like labeling objects or completing sentences, make learning engaging and tailored to young learners’ developmental needs for grade 1 reading comprehension.

Assessment and Feedback Strategies

Effective assessment involves leveled passages and clear questions to gauge understanding. Immediate feedback through answer keys helps track progress, guiding instruction and fostering improvement in young learners.

5.1. Aligning Questions with Curriculum Standards

Grade 1 reading comprehension PDFs include questions aligned with curriculum standards, ensuring they assess skills like identifying main ideas, sequencing, and understanding vocabulary. These resources, designed by educators, align with state or national education standards, providing targeted practice and support for young learners to master foundational reading skills effectively.

5.2. Tracking Progress Over Time

Grade 1 reading comprehension PDFs often include progress-tracking features, such as answer keys and scoring guides, allowing educators and parents to monitor improvement. These resources help identify areas where students may need extra support, ensuring steady growth in reading skills and comprehension abilities over time.

5.3. Providing Constructive Feedback

Constructive feedback in grade 1 reading comprehension PDFs helps students understand their strengths and areas for improvement. Clear explanations and positive reinforcement guide young learners, fostering confidence and a growth mindset. Immediate feedback from answer keys enables targeted practice, ensuring steady progress in reading and comprehension skills over time.

Role of Visual Aids in Comprehension

Visual aids like colorful images and engaging illustrations in grade 1 reading comprehension PDFs enhance understanding, making stories relatable and accessible for young learners.

6.1. Images That Support and Enhance Text

Images in grade 1 reading comprehension PDFs directly relate to the text, aiding young learners in understanding complex narratives. Colorful, engaging illustrations help students visualize stories, making comprehension easier and more enjoyable. These visuals also cater to different learning styles, particularly benefiting visual learners by breaking down complex ideas into relatable scenes. This approach enhances vocabulary development by providing context clues, ensuring a deeper connection to the material and fostering a love for reading. Such features make learning interactive and effective for early learners.

6.2. Colorful Illustrations to Engage Young Learners

Colorful illustrations in grade 1 reading comprehension PDFs captivate young learners, making reading interactive and enjoyable. These visuals simplify complex stories, helping children visualize narratives and connect with characters. Bright images cater to visual learners, enhancing engagement and motivation. They also make learning fun, fostering a positive association with reading and encouraging early literacy development.

Cultural and Social Relevance in Content

Culturally relevant stories in grade 1 reading comprehension PDFs foster inclusivity, helping children connect with diverse characters and real-world experiences, promoting empathy and broadening their understanding of different cultures and societies.

7.1. Incorporating Diverse Characters and Settings

Grade 1 reading comprehension PDFs often feature diverse characters and settings, reflecting various cultures, family structures, and traditions. These elements help children connect with stories, fostering empathy and understanding of different backgrounds, while making the content relatable and inclusive for all learners.

7.2. Connecting Stories to Real-World Experiences

Grade 1 reading comprehension PDFs often include stories that mirror real-life scenarios, making it easier for children to relate and understand the content. These relatable narratives help students connect abstract concepts to their everyday experiences, fostering a deeper comprehension and sparking curiosity about the world around them.

Supporting Diverse Learners

Grade 1 reading comprehension PDFs support diverse learners by accommodating different learning styles and scaffolding difficult concepts to ensure all students can succeed through varied activities and visual aids.

8.1. Accommodating Different Learning Styles

Grade 1 reading comprehension PDFs cater to diverse learners by offering varied activities, such as multiple-choice questions, fill-in-the-blank exercises, and engaging stories with visuals, ensuring all learning styles are supported through interactive and adaptable resources.

8.2. Scaffolding Difficult Concepts for Understanding

Grade 1 reading comprehension PDFs use leveled passages and visual aids to break down complex ideas, gradually introducing challenging vocabulary and concepts. This approach, supported by clear questions and immediate feedback, helps young learners grasp difficult texts step-by-step, fostering confidence and independent reading skills over time.

Integration with Other Subjects

Grade 1 reading comprehension PDFs connect with writing, speaking, and STEM topics, reinforcing learning across subjects through engaging stories and activities that promote holistic development.

9.1. Linking Reading to Writing and Speaking Skills

Grade 1 reading comprehension PDFs often include writing prompts and discussion questions, enabling students to express their understanding through writing and verbal communication, thereby strengthening their overall language skills and confidence.

9.2. Connecting Comprehension to STEM Topics

Grade 1 reading comprehension PDFs often feature STEM-related passages, such as stories about animals or simple machines, helping students apply reading skills to understand technical content and fostering curiosity in science, technology, engineering, and math from an early age.

Tips for Effective Practice

Consistency is key. Set aside time each day for reading, using grade 1 reading comprehension PDFs with engaging stories and questions to keep young learners focused and motivated.

10.1. Creating a Daily Reading Routine

Establishing a consistent reading routine helps grade 1 students develop a love for reading while improving comprehension skills. Use engaging PDF worksheets with colorful images and leveled stories to maintain interest. Incorporate varied question types, such as multiple-choice and true/false, to keep sessions interactive. Track progress weekly and celebrate small improvements to build confidence and motivation.

10.2. Using Technology to Enhance Practice

Incorporate digital tools like interactive PDFs and educational apps to make reading practice engaging for grade 1 students. Gamified activities and audio-assisted stories enhance comprehension skills. Technology provides immediate feedback, helping students identify strengths and areas for improvement while keeping learning fun and accessible at home or in the classroom.

Future Trends in Reading Comprehension Resources

Future trends include interactive and adaptive PDFs, personalized learning experiences, and increased use of digital tools to enhance engagement and accessibility for young learners.

11.1. Increasing Use of Digital and Interactive PDFs

Digital and interactive PDFs are becoming popular for their engaging features, such as clickable links, animations, and real-time feedback, enhancing learning experiences and making resources more accessible for teachers and students.

11.2. Personalized Learning Through Adaptive Resources

Adaptive PDF resources tailor reading comprehension exercises to individual learning needs, offering interactive elements like multiple-choice questions and real-time feedback. This approach ensures personalized progress, engaging young learners and enhancing skill mastery at their own pace.

bios blood pressure monitor instructions

Welcome to the BIOS Blood Pressure Monitor guide. This device helps you track your blood pressure and pulse rate accurately. Designed for home use, it ensures convenience and reliability for maintaining your health. Follow the manual for proper setup and usage to get the most out of your monitor.

Overview of the Device

The BIOS Blood Pressure Monitor is a user-friendly device designed to provide accurate measurements of blood pressure and pulse rate. It features a digital display with large, easy-to-read numbers, making it ideal for home use. The monitor comes with a comfortable cuff that fits snugly around the arm, ensuring precise readings. Advanced functions include memory storage for tracking previous measurements, allowing users to monitor their health over time. The device is powered by batteries, making it portable and convenient for use anywhere. With its simple interface and reliable performance, the BIOS Blood Pressure Monitor is a practical tool for maintaining cardiovascular health. It is suitable for both personal and professional use, offering a balance of affordability and quality. Regular updates and maintenance ensure optimal functionality.

Importance of Blood Pressure Monitoring

Monitoring blood pressure is essential for maintaining cardiovascular health. High blood pressure, or hypertension, can lead to severe conditions like heart disease and stroke if left unmanaged. Regular monitoring helps detect potential issues early, allowing for timely medical intervention. It also enables individuals to track the effectiveness of lifestyle changes or medications. For those at risk, such as individuals with a family history of hypertension or obesity, consistent monitoring is crucial. The BIOS Blood Pressure Monitor provides accurate readings, empowering users to take control of their health proactively. By understanding blood pressure trends, individuals can make informed decisions to reduce risks and improve overall well-being. Regular monitoring fosters awareness and encourages healthier habits, which are vital for long-term health management.

Preparing for Use

Before using the BIOS Blood Pressure Monitor, ensure the environment is quiet and comfortable. Properly unbox and set up the device as instructed in the manual.

Unboxing and Initial Setup

When you unbox your BIOS Blood Pressure Monitor, ensure all components are included: the monitor, cuff, adapter, and manual. Carefully inspect for damage. Place the monitor on a flat surface and insert the batteries or connect the power adapter as specified. Allow the device to power up and complete any self-test. Read the manual thoroughly to understand the features and settings. Familiarize yourself with the buttons and display. Before first use, ensure the cuff is the correct size and properly attached. Follow the setup instructions to initialize the device and prepare it for accurate measurements. Proper setup ensures reliable performance and accurate readings. If any issues arise, refer to the troubleshooting section in the manual.

Environment and User Preparation

Before using the BIOS Blood Pressure Monitor, ensure you are in a quiet, comfortable environment. Avoid eating, drinking, or exercising for at least 30 minutes prior to measurement. Sit in a relaxed position with your back supported and feet flat on the floor. Remove tight clothing and ensure your arm is bare. Place your arm on a flat surface at heart level. Avoid talking or moving during measurement, as this may affect accuracy. Ensure the room temperature is comfortable to prevent any discomfort. Proper preparation helps ensure precise and reliable readings. Follow these guidelines to achieve accurate blood pressure measurements and maintain consistent monitoring results. Always refer to the manual for specific preparation instructions tailored to your device.

Operating the Monitor

Turn on the BIOS Blood Pressure Monitor by pressing the power button. Allow the device to initialize, then follow the on-screen instructions to begin measurement. Ensure the cuff is correctly applied and remain still during the process for accurate results. The monitor will display your blood pressure and pulse rate once the measurement is complete. Refer to the manual for detailed operation steps and troubleshooting tips to ensure optimal performance. Always follow the guidelines provided to achieve precise and reliable readings. Proper operation is key to maintaining your health and obtaining consistent data.

Applying the Cuff Correctly

To ensure accurate measurements, the cuff must be applied properly. Place the cuff on a bare arm, avoiding tight clothing that may interfere with the reading. Position the cuff so the artery marker aligns with the artery on the inside of your arm. The cuff should be snug but not overly tight—leave enough space to fit two fingers comfortably. Avoid bending your arm or moving during measurement, as this can affect accuracy. If using a wrist monitor, ensure your arm is at heart level and remain still. Proper cuff placement and fit are crucial for reliable blood pressure readings. Always refer to the manual for specific guidelines on cuff application to achieve consistent and accurate results. Correct application ensures the device functions optimally and provides trustworthy data for your health monitoring.

Conducting Measurements

To begin, ensure the cuff is properly applied and the device is turned on. Press the START button to initiate the measurement process. Remain still and silent during the measurement, as movement or noise can affect accuracy. The monitor will inflate the cuff automatically and then slowly deflate while measuring your blood pressure and pulse rate. Once complete, the device will display your systolic, diastolic, and pulse readings on the screen. Ensure your arm is at heart level and avoid crossing your legs or bending your arm during the process. For wrist monitors, keep your arm straight and at chest level. After the measurement, the device may automatically shut off. Review the readings to ensure they are clear and accurate. If unsure, repeat the process as needed. Proper technique ensures reliable results for effective blood pressure management. Always follow the device’s specific instructions for optimal performance. Regular measurements help track your health effectively.

Maintaining and Troubleshooting

Regularly clean the device with a soft cloth and avoid exposure to moisture. Store the monitor in a dry place to ensure longevity. Check for loose connections and proper cuff placement to resolve common issues. Refer to the manual for troubleshooting tips or resetting the device. Proper maintenance ensures accurate readings and extends the device’s lifespan. Always follow the manufacturer’s guidelines for care and repair. Addressing issues promptly helps maintain optimal performance and reliability.

Cleaning and Storing the Device

To maintain the BIOS Blood Pressure Monitor, clean it with a soft, dry cloth. Avoid using harsh chemicals or moisture, as this could damage the device. Store the monitor in a cool, dry place, away from direct sunlight and extreme temperatures. Ensure the cuff is neatly folded and kept in a protective case to prevent dust or creases. Regular cleaning ensures accurate readings and prolongs the device’s lifespan. For storage, remove the batteries if the device will not be used for an extended period. Always follow the manufacturer’s guidelines for care to maintain optimal performance and reliability. Proper storage and cleaning practices are essential for ensuring the device remains functional and accurate over time.

Resolving Common Issues

If your BIOS Blood Pressure Monitor displays an error code, refer to the manual for specific troubleshooting steps. Common issues include incorrect cuff placement or loose connections. Turn the device off and on again to reset it. Ensure the cuff is properly fitted and aligned with your artery. If the monitor fails to turn on, check the battery life or connections. For inaccurate readings, verify your posture and arm position. If issues persist, consult the user manual or contact customer support. Regularly updating the device’s firmware, if applicable, can also resolve performance problems. Always follow the manufacturer’s guidelines for troubleshooting to ensure accurate measurements and optimal device functionality. Proper care and maintenance can prevent many common issues from arising.

Understanding Results and Advanced Features

Learn to interpret your blood pressure readings and utilize advanced features like memory storage and data tracking. These tools help monitor trends and manage your health effectively.

Interpreting Readings

Understanding your blood pressure readings is crucial for managing your health. The BIOS Blood Pressure Monitor displays systolic and diastolic pressures, along with pulse rate. Systolic pressure (top number) measures pressure during heartbeats, while diastolic (bottom number) measures pressure between beats. A normal reading is typically below 120/80 mmHg. Elevated readings may indicate hypertension, requiring lifestyle changes or medical consultation. Use the device consistently to track trends and detect patterns. Record your measurements to share with healthcare providers for better diagnosis and treatment plans. Regular monitoring helps in early detection of potential issues, ensuring timely interventions. Always refer to the manual for guidance on interpreting readings accurately and utilizing advanced features like memory storage for long-term health management.

Utilizing Memory and Advanced Functions

The BIOS Blood Pressure Monitor offers advanced features to enhance your monitoring experience. The device includes a memory function that stores previous readings, allowing you to track your blood pressure trends over time. To access stored data, press the memory button, and scroll through the readings using navigation keys. For accuracy, ensure the device is updated with the latest software, which can be done via USB or Bluetooth connectivity. Additionally, the monitor features irregular heartbeat detection, alerting you to potential issues. Regularly review and manage stored data to maintain accurate records. Use the delete function to clear old readings when memory is full, ensuring optimal performance and data organization. These features empower you to take control of your health effectively. Always refer to the manual for detailed instructions on utilizing these functions.

Safety, Warranty, and Support

The BIOS Blood Pressure Monitor comes with a warranty covering manufacturing defects. Follow safety guidelines to avoid damage. For assistance, contact BIOS customer support directly through their official website or helpline.

Safety Precautions

Always use the BIOS Blood Pressure Monitor as instructed to ensure safety and accuracy. Avoid exposing the device to extreme temperatures or moisture, as this may damage the internal components. Keep the monitor out of reach of children and avoid using it near water. Regularly inspect the cuff and wires for signs of wear or damage. Do not use the device if it appears damaged or malfunctioning. Follow the recommended usage guidelines to prevent inaccurate readings. If you experience discomfort or unusual results, discontinue use and consult a healthcare professional. Proper handling and adherence to safety guidelines will ensure reliable performance and extend the lifespan of your monitor.

Warranty Information and Customer Support

The BIOS Blood Pressure Monitor is backed by a manufacturer’s warranty, typically covering defects in materials and workmanship for a period of one year from the date of purchase. For specific warranty details, refer to the product manual or contact BIOS customer support. If you encounter any issues, support is available through various channels, including phone, email, or the official BIOS website. Be prepared to provide your product serial number and proof of purchase for assistance. For troubleshooting, repairs, or replacements under warranty, follow the instructions provided by the support team. Additionally, online resources and user manuals are accessible on the BIOS Medical support center website. Ensure to register your product for warranty validation and updates on new features or services.

bose soundlink mini instruction manual

Welcome to the Bose SoundLink Mini instruction manual! This guide provides essential information for setting up‚ using‚ and maintaining your Bluetooth speaker. Read it carefully to ensure optimal performance and safe operation.

Overview of the Bose SoundLink Mini Bluetooth Speaker

The Bose SoundLink Mini is a portable Bluetooth speaker designed for high-quality wireless audio. Compact and lightweight‚ it delivers crisp‚ balanced sound with deep bass. Compatible with smartphones‚ tablets‚ and laptops‚ it offers seamless connectivity and up to 10 hours of battery life. Its sleek design and intuitive controls make it perfect for indoor or outdoor use‚ ensuring an exceptional audio experience wherever you go.

Importance of Reading the Manual

Reading the Bose SoundLink Mini manual is crucial for optimal performance and safety. It provides step-by-step guidance for setup‚ pairing‚ and troubleshooting‚ ensuring you unlock all features. The manual also outlines safety precautions‚ warranty details‚ and maintenance tips to prolong the speaker’s life. By following the instructions‚ you can avoid common issues and enjoy a seamless audio experience tailored to your needs.

System Requirements and Compatibility

The Bose SoundLink Mini is designed to work with Bluetooth-enabled devices‚ ensuring seamless connectivity. Ensure your device meets the speaker’s compatibility and software requirements for optimal performance.

Compatible Devices for Bluetooth Connection

The Bose SoundLink Mini is compatible with most Bluetooth-enabled devices‚ including smartphones‚ tablets‚ laptops‚ and more. It supports devices with Bluetooth technology‚ ensuring a stable and high-quality wireless connection. Simply pair your device by selecting the speaker from your device’s Bluetooth menu. The speaker also remembers previously connected devices for easy reconnection. This versatility allows you to enjoy seamless audio streaming from a wide range of sources.

Software and Firmware Requirements

To ensure optimal performance‚ download and install the Bose Connect app for easy setup and firmware updates. Regular firmware updates are essential for maintaining functionality and improving your speaker’s performance. Always use approved Bose software and accessories to avoid compatibility issues. Updates can be performed via the app or through the Bose official website. Keeping your speaker’s firmware up-to-date ensures you have the latest features and enhancements.

Pairing Your Device with the Bose SoundLink Mini

Pairing your device is easy! Turn on the speaker‚ enable Bluetooth on your device‚ and select “Bose SoundLink Mini” from the available options. Follow voice prompts for confirmation.

Step-by-Step Pairing Instructions

  1. Turn on your Bose SoundLink Mini speaker.
  2. Enable Bluetooth on your device (smartphone‚ tablet‚ or laptop).
  3. Open your device’s Bluetooth settings and select “Bose SoundLink Mini” from the list of available devices.
  4. Your speaker will confirm the connection with a voice prompt or a tone.
  5. Once paired‚ you can start streaming music wirelessly to your speaker;

Follow these steps to establish a secure Bluetooth connection and enjoy uninterrupted audio playback.

Troubleshooting Pairing Issues

If your Bose SoundLink Mini isn’t pairing‚ ensure it’s in pairing mode by holding the Bluetooth button until the indicator blinks blue. Restart both the speaker and your device. Check that the speaker isn’t connected to another device and that it’s fully charged. If issues persist‚ reset the speaker by pressing and holding the mute button for 10 seconds. This should resolve most connectivity problems and restore proper pairing functionality.

Controlling Your Bose SoundLink Mini

Use the control buttons on top of the speaker to adjust volume‚ play/pause‚ and skip tracks. The buttons are intuitive‚ ensuring easy navigation and seamless control.

Understanding the Control Buttons

The Bose SoundLink Mini features a set of intuitive control buttons located on the top of the speaker. These buttons allow you to adjust volume‚ play/pause music‚ and skip tracks. The volume up and volume down buttons enable precise sound control‚ while the play/pause button manages music playback. The next/previous buttons let you skip tracks or return to the previous song. Additionally‚ the Bluetooth button helps with pairing devices‚ ensuring seamless connectivity and control over your audio experience.

Using Voice Prompts for Guidance

The Bose SoundLink Mini provides voice prompts to guide you through key functions like pairing‚ connecting‚ and switching modes. When pairing‚ the speaker announces “Ready to connect” and confirms connections with a tone. The Bluetooth button triggers voice prompts‚ while the blinking blue LED indicates pairing status. These prompts simplify operation‚ ensuring a seamless experience. Use them to navigate settings and resolve connectivity issues effortlessly‚ enhancing your overall user experience with clear‚ audible assistance.

Connecting Via Auxiliary Input

Plug the 3.5mm audio cable into the AUX connector on the Bose SoundLink Mini’s side. Press the AUX button to activate AUX mode. The LED turns white when connected.

Using the AUX Connector

To use the AUX connector‚ locate the 3.5mm input on the side of your Bose SoundLink Mini. Insert one end of a standard 3.5mm audio cable into this port. Connect the other end to the headphone or AUX output of your device. Press the AUX button on the speaker to switch to AUX mode. The LED will turn white‚ indicating a successful connection. Ensure the cable is securely plugged in for optimal sound quality. Avoid using damaged cables to prevent audio issues.

Switching Between Bluetooth and AUX Modes

To switch between Bluetooth and AUX modes on your Bose SoundLink Mini‚ press and hold the Bluetooth button until the LED indicator flashes. This action cycles through the available modes. When using an AUX cable‚ plug it into the 3.5mm input‚ and the speaker will automatically switch to AUX mode. The LED will change to white‚ confirming the mode change. Ensure Bluetooth is disconnected before using AUX for uninterrupted audio playback. This seamless transition ensures optimal performance in both modes.

Charging and Battery Life

To charge your Bose SoundLink Mini‚ connect it to a USB port using the provided cable and a wall charger. The LED indicator will show charging status. Allow 3-4 hours for a full charge. Avoid overcharging to maintain battery health. This ensures optimal performance and extends the speaker’s lifespan.

Charging Instructions and Safety Precautions

To charge your Bose SoundLink Mini‚ connect the USB cable to a wall charger or computer. The LED indicator will glow amber during charging and turn green when fully charged. Charging typically takes 3-4 hours. Avoid overheating by keeping the speaker away from direct sunlight or heat sources. Use only Bose-approved chargers and cables to prevent damage. Unplug the speaker when not in use to conserve battery life and ensure safety.

Maximizing Battery Life

To extend the battery life of your Bose SoundLink Mini‚ avoid extreme temperatures and direct sunlight. Use the original Bose charger and cable to prevent damage. Keep the speaker away from heat sources during charging. Update the firmware regularly for optimized performance. Store the device with a partial charge if unused for long periods. Avoid deep discharges by recharging when the battery level is low. This ensures your speaker performs at its best for years to come.

Safety Information and Precautions

Read all safety instructions carefully. Avoid placing the speaker near heat sources like radiators or stoves. Use only approved Bose accessories to prevent damage or hazards.

Important Safety Instructions

Read all safety guidelines carefully to ensure safe operation. Avoid exposing the speaker to extreme temperatures‚ moisture‚ or physical stress. Keep it away from heat sources like radiators or stoves. Use only Bose-approved accessories to prevent damage or electrical hazards. Do not attempt repairs yourself‚ as this may void the warranty. Follow all instructions provided in this manual to maintain performance and safety. Proper handling ensures longevity and prevents potential risks.

Avoiding Heat Sources and Other Hazards

To ensure safe and optimal performance‚ keep the Bose SoundLink Mini away from heat sources such as radiators‚ stoves‚ or direct sunlight. Avoid exposing it to moisture or extreme temperatures. Do not submerge the speaker in water or place it near open flames. Prevent physical stress by avoiding drops or heavy impacts. Follow these guidelines to maintain the speaker’s functionality and prevent potential damage or safety risks.

Maintenance and Care

Regularly clean the speaker with a soft‚ dry cloth to prevent dust buildup. Avoid harsh chemicals or abrasive materials. Keep the speaker dry and away from extreme temperatures for optimal performance.

Cleaning the Speaker

To maintain your Bose SoundLink Mini speaker’s performance and appearance‚ clean it regularly. Use a soft‚ dry cloth to wipe away dust and dirt from the surface. For stubborn stains‚ dampen the cloth slightly with water‚ but avoid getting the speaker wet. Never use harsh chemicals‚ abrasive cleaners‚ or liquids‚ as they may damage the finish or internal components. For the grille‚ gently brush away debris with a dry cloth or a small‚ dry brush. Avoid removing the grille‚ as this could damage the speaker. Regular cleaning ensures optimal sound quality and longevity.

Updating Firmware

To ensure optimal performance‚ regularly update your Bose SoundLink Mini firmware. Connect the speaker to your computer using a USB cable‚ then visit the Bose website to download the latest update. Alternatively‚ use the Bose Connect app to check for and install new firmware. Always ensure the speaker is fully charged before updating. Do not interrupt the process once started‚ as it may cause issues. For detailed instructions‚ refer to the Bose support page or app guidance.

Troubleshooting Common Issues

This section helps resolve common issues like no sound or connectivity drops. Follow step-by-step guides to diagnose and fix problems‚ ensuring uninterrupted audio enjoyment. Resetting the speaker or checking Bluetooth connections often solves most concerns. Refer to detailed solutions for specific errors to restore proper functionality quickly and efficiently. Always ensure your device and speaker are fully updated for optimal performance.

Resolving Connectivity Problems

If experiencing dropped connections or pairing issues‚ restart your Bose SoundLink Mini and ensure Bluetooth is enabled on your device. Clear the speaker from your device’s Bluetooth list and retry pairing. If issues persist‚ reset the speaker by pressing and holding the Bluetooth and Volume Down buttons simultaneously for 10 seconds. This restores default settings and often resolves connectivity problems. Ensure your device and speaker are within range and updated to the latest firmware for stable connections.

Addressing Sound Quality Concerns

If experiencing poor sound quality‚ ensure the Bose SoundLink Mini is placed away from walls and corners to optimize audio performance. Check for firmware updates‚ as outdated software may affect sound clarity. If using Bluetooth‚ move devices closer to avoid interference. For AUX connections‚ ensure the cable is secure and undamaged. Resetting the speaker by pressing and holding the Bluetooth and Volume Down buttons for 10 seconds may resolve issues. Contact Bose support if problems persist.

Final Tips for Optimal Use

For the best experience with your Bose SoundLink Mini‚ ensure your speaker is always updated with the latest firmware. Use genuine Bose accessories to maintain performance and safety. Fully charge the battery before extended use for accurate battery life tracking. Avoid exposing the speaker to extreme temperatures or moisture. Clean the grille regularly with a soft cloth to prevent dust buildup. Lastly‚ explore the Bose Connect app for additional features and customization options.

Accessing Bose Support and Manuals

Visit the official Bose website to download the Bose SoundLink Mini instruction manual in PDF format. For additional support‚ use the Bose Connect app to guide you through setup and troubleshooting. Explore the Bose support page for FAQs‚ firmware updates‚ and warranty information. Contact Bose customer service directly via phone or email for personalized assistance. Ensure you have the latest resources to make the most of your speaker.

sound blaster jam v2 manual

The Sound Blaster Jam V2 is a lightweight on-ear Bluetooth headphone upgraded with Bluetooth 5.0, multipoint connectivity, and advanced audio codecs for enhanced listening experiences.

Overview of the Sound Blaster Jam V2

The Sound Blaster Jam V2 is a sleek, on-ear Bluetooth headphone designed for everyday use. It combines lightweight comfort with advanced audio technologies, making it ideal for music lovers and professionals. Featuring Bluetooth 5.0 and multipoint connectivity, it ensures seamless pairing with multiple devices. The headphone also boasts dual microphones with Qualcomm cVc 8.0 noise reduction, enhancing call clarity. With support for aptX Low Latency and aptX HD, it delivers high-quality audio with minimal lag. Its compact design and intuitive controls make it a versatile choice for both casual listening and productivity.

Key Features and Upgrades

The Sound Blaster Jam V2 introduces several notable upgrades, including Bluetooth 5.0 for stable connections and extended range. Multipoint connectivity allows pairing with two devices simultaneously, enhancing versatility. Advanced audio codecs like aptX Low Latency and aptX HD ensure clear, high-quality sound with minimal delay. The dual microphones integrated with Qualcomm cVc 8.0 technology improve voice clarity during calls. Its lightweight design provides comfort for extended use, while the intuitive controls offer easy access to music and call management. These features collectively elevate the Jam V2 as a top choice for both audio enthusiasts and everyday users seeking a reliable Bluetooth headphone.

Key Features of the Sound Blaster Jam V2

Experience crystal-clear audio and seamless connectivity with the Sound Blaster Jam V2, featuring Bluetooth 5.0, aptX HD, and dual microphones for enhanced call quality and noise reduction.

Bluetooth 5.0 and Multipoint Connectivity

The Sound Blaster Jam V2 boasts Bluetooth 5.0, offering a stable and fast connection. Its multipoint connectivity allows pairing with two devices simultaneously, ensuring seamless switching between calls, music, and media. This feature is ideal for multitaskers, enabling smooth transitions without the need to reconnect. With an extended range and reliable signal strength, users can enjoy uninterrupted audio experiences across various devices. This advanced connectivity enhances the overall listening experience, making the Jam V2 versatile for both work and leisure environments.

Advanced Audio Codecs: aptX Low Latency and aptX HD

The Sound Blaster Jam V2 supports aptX Low Latency and aptX HD codecs, delivering high-quality audio with minimal delay. aptX Low Latency ensures synchronized sound for gaming and video streaming, while aptX HD provides detailed, high-fidelity audio. These codecs enhance the listening experience, offering clear and immersive sound reproduction. With reduced latency and improved audio clarity, users can enjoy seamless real-time audio and rich, distortion-free music. These advanced codecs make the Jam V2 ideal for both entertainment and professional audio needs, ensuring a superior sonic experience.

Dual Microphones with Qualcomm cVc 8.0 Noise Reduction

The Sound Blaster Jam V2 features dual microphones enhanced with Qualcomm cVc 8.0 noise reduction technology. This advanced system minimizes background noise and ensures clear voice capture during calls. The dual microphones work in tandem to pick up your voice accurately, while cVc 8.0 actively reduces ambient sounds, providing a more refined communication experience. Whether in noisy environments or during calls, your voice remains clear and intelligible. This technology boosts call quality, making the Jam V2 an excellent choice for hands-free conversations and voice commands, ensuring optimal performance in various settings.

Lightweight and Comfortable Design

The Sound Blaster Jam V2 is designed with comfort and portability in mind, featuring an ultralight on-ear construction. Weighing just 210 grams, these headphones provide a snug yet comfortable fit, ideal for extended use. The ear cushions are soft and breathable, reducing pressure on the ears. The adjustable headband ensures a secure fit for various head sizes. Its foldable design allows for easy storage in the provided travel pouch, making it perfect for on-the-go use. This blend of lightweight materials and ergonomic design ensures long-lasting comfort without compromising on sound quality or style.

Setting Up Your Sound Blaster Jam V2

Setting up your Sound Blaster Jam V2 involves unboxing, charging, and pairing with Bluetooth devices. Refer to the manual for detailed steps and troubleshooting guides.

Unboxing and Initial Setup

Upon unboxing the Sound Blaster Jam V2, you’ll find the headphones, a USB-C charging cable, and a quick start guide. Before use, charge the device fully using the provided cable. Ensure the headphones are turned off during charging. Once charged, power them on and enter pairing mode by holding the multifunction button until the LED flashes blue. This process prepares your Jam V2 for Bluetooth pairing with your preferred device, ensuring a seamless initial setup experience. Refer to the manual for additional details and safety information. Always follow proper charging procedures to maintain battery health and performance.

Pairing with Bluetooth Devices

To pair the Sound Blaster Jam V2, ensure Bluetooth is enabled on your device. Turn on the headphones and hold the multifunction button until the LED flashes blue, indicating pairing mode. Select “Sound Blaster Jam V2” from your device’s Bluetooth menu. Once connected, the LED will turn solid blue. For troubleshooting, restart both devices or reset the headphones by holding the multifunction and volume buttons for 5 seconds. Refer to the manual for detailed instructions. The Jam V2 supports multipoint connectivity, allowing connection to two devices simultaneously for enhanced convenience.

Downloading the User Manual

To download the Sound Blaster Jam V2 user manual, visit the official Creative Labs website at creative.com/compliance/sbjamv2. This manual provides detailed instructions for setup, pairing, and troubleshooting. It also includes safety information and regulatory compliance details. For advanced users, the manual covers battery removal procedures, which should only be performed by qualified professionals. Ensure you refer to the latest version of the manual for accurate and up-to-date guidance on using your Sound Blaster Jam V2 headphones effectively.

Using the Sound Blaster Jam V2

Experience seamless audio with the Sound Blaster Jam V2, featuring Bluetooth 5.0 and advanced codecs for high-quality sound and low latency, perfect for everyday use.

Controls and Functions

The Sound Blaster Jam V2 features intuitive controls, including play/pause, track navigation, and volume adjustment. The multifunction button also manages calls and Bluetooth pairing. Dual microphones with Qualcomm cVc 8.0 enhance voice clarity during calls. The headphones support multipoint connectivity, allowing simultaneous pairing with two devices. Advanced audio codecs like aptX Low Latency and aptX HD ensure high-quality sound and minimal delay. These features make the Jam V2 versatile for music, calls, and multimedia use, offering a seamless and user-friendly experience.

Optimizing Audio Quality

To enhance your listening experience with the Sound Blaster Jam V2, utilize its advanced audio codecs like aptX Low Latency and aptX HD for high-fidelity sound. Ensure a stable Bluetooth 5.0 connection by keeping devices within range and avoiding interference. Adjust equalizer settings through the companion app to tailor the sound to your preference. Regularly clean the ear cushions and store the headphones properly to maintain audio clarity. By following these steps, you can enjoy immersive and distortion-free audio performance from your Sound Blaster Jam V2 headphones.

Managing Battery Life

The Sound Blaster Jam V2 offers up to 22 hours of playtime on a single charge. To maximize battery life, enable power-saving mode when not in use and avoid overcharging. Turn off Bluetooth and other features when idle. Store the headphones in a cool, dry place to preserve battery health. Avoid draining the battery completely before charging, as this can reduce its lifespan. Use the provided cable for charging to ensure optimal performance. By following these tips, you can enjoy extended listening sessions and maintain the longevity of your Sound Blaster Jam V2 headphones.

Troubleshooting Common Issues

Resolve connectivity or audio problems by resetting your Sound Blaster Jam V2. Turn headphones off, then on, and retry pairing with your device for a stable connection.

Connecting Issues and Solutions

Experiencing connection problems with your Sound Blaster Jam V2? Restart your headphones by turning them off and then on again. Ensure your device’s Bluetooth is enabled and in range. If issues persist, reset the headphones by holding the multifunction button for 10 seconds until the LED flashes red and blue. Then, attempt pairing again. For further assistance, refer to the user manual available at creative.com/compliance/sbjamv2 for detailed troubleshooting steps and guidelines.

Audio Quality Problems

Encounter audio quality issues with your Sound Blaster Jam V2? Ensure your device supports aptX Low Latency or aptX HD for optimal sound. Check for a stable Bluetooth connection, as physical obstructions or distance may cause interference. Reset your headphones by holding the multifunction button for 10 seconds until the LED flashes red and blue. If issues persist, refer to the user manual at creative.com/compliance/sbjamv2 for advanced troubleshooting steps and guidelines to restore high-quality audio performance.

Battery and Charging Concerns

Experiencing issues with your Sound Blaster Jam V2’s battery or charging? Ensure the charging port is free from debris and use the original USB cable. If the battery isn’t charging, reset the headphones by holding the multifunction button for 10 seconds until the LED flashes red and blue. Avoid extreme temperatures, as they can affect battery performance. For prolonged battery life, charge the headphones when the battery level is low. Refer to the user manual at creative.com/compliance/sbjamv2 for detailed battery care and charging guidelines.

The Sound Blaster Jam V2 offers a lightweight, feature-rich listening experience with advanced Bluetooth connectivity and audio quality, making it an excellent choice for everyday use.

Final Thoughts on the Sound Blaster Jam V2

The Sound Blaster Jam V2 impresses with its lightweight design, advanced Bluetooth 5.0 connectivity, and high-quality audio codecs like aptX Low Latency and aptX HD. Designed for seamless listening experiences, it caters to commuters and everyday users seeking convenience and clarity. The dual microphones with Qualcomm cVc 8.0 noise reduction ensure crisp calls, while the multipoint connectivity allows easy switching between devices. Its comfortable fit and long battery life make it ideal for extended use. With a user-friendly manual and reliable performance, the Sound Blaster Jam V2 stands out as a practical and enjoyable wireless headphone option for modern listeners.

a written test ontario pdf with answers punjabi

Welcome to the Ontario G1 written test guide in Punjabi! This essential resource helps Punjabi-speaking individuals prepare for the Ontario driver’s license knowledge test. Designed for new drivers, the test assesses understanding of road rules, traffic signs, and safe driving practices; With PDF study materials and practice tests available in Punjabi, candidates can efficiently prepare and achieve success. This guide provides a comprehensive overview of the test structure, study tips, and resources to ensure confident preparation.

Overview of the G1 Written Test

The Ontario G1 written test is a mandatory knowledge exam for new drivers, assessing understanding of road rules, traffic signs, and safe driving practices. It consists of 40 multiple-choice questions, with 20 focusing on traffic signs and 20 on driving rules. Candidates need at least 16 correct answers in each section to pass. The test is available in Punjabi, making it accessible for Punjabi-speaking individuals. Proper preparation using PDF resources and practice tests is crucial for success, ensuring a strong foundation for obtaining a G1 license and progressing in the graduated licensing program.

Importance of Preparing in the Punjabi Language

Preparing for the Ontario G1 written test in Punjabi is crucial for individuals whose primary language is Punjabi. It ensures better comprehension of complex driving rules and traffic signs. Using study materials in Punjabi reduces language barriers and enhances retention of key concepts. Practice tests and PDF resources in Punjabi allow candidates to familiarize themselves with the test format and content in a comfortable and accessible manner. This targeted preparation boosts confidence and improves overall performance, making it easier to succeed on the G1 written test.

Structure of the Ontario G1 Written Test

The Ontario G1 written test consists of 40 multiple-choice questions, divided into two sections: 20 on road signs and 20 on driving rules. To pass, you must answer at least 16 questions correctly in each section.

Sections of the Test: Rules and Signs

The Ontario G1 written test is divided into two main sections: Rules of the Road and Traffic Signs and Signals. Each section contains 20 multiple-choice questions. The Rules section tests knowledge of driving laws, safe practices, and driver responsibilities. The Signs section evaluates the ability to identify and understand traffic signs, including warning, regulatory, and guide signs. Both sections are essential for safe driving and must be mastered to pass the test. Accurate knowledge of these areas ensures compliance with Ontario’s traffic laws and enhances road safety.

Question Format and Scoring System

The Ontario G1 written test features 40 multiple-choice questions, divided equally into two sections: Rules of the Road and Traffic Signs. Each question offers several options, with only one correct answer. To pass, you must correctly answer at least 16 questions in each section. The scoring system is strict, allowing no more than 4 incorrect answers in total. Understanding the format and scoring ensures you can navigate the test confidently and avoid unnecessary mistakes. Proper preparation is key to achieving the required score and progressing toward your driver’s license.

PDF Resources for the Ontario Written Test in Punjabi

Punjabi-speaking candidates can access essential PDF resources, including practice tests and answer keys, to effectively prepare for the Ontario G1 written test. These materials are available for free download and provide comprehensive coverage of road rules and traffic signs, ensuring thorough preparation in the Punjabi language.

Benefits of Using PDF Study Materials

PDF study materials for the Ontario written test in Punjabi offer numerous benefits, including easy accessibility and portability. Candidates can download and print these resources, allowing for offline study at any time. The structured format ensures comprehensive coverage of road rules, traffic signs, and driving practices. Additionally, many PDF resources include answer keys, enabling self-assessment and tracking of progress. This convenience makes PDFs an essential tool for effective preparation, helping candidates familiarize themselves with the test format and improve their knowledge confidently. They are a valuable asset for achieving success in the G1 written test.

Popular PDF Resources with Answers

Several popular PDF resources are available to help prepare for the Ontario written test in Punjabi. These include comprehensive study guides with answer keys, offering detailed explanations for correct and incorrect responses. Many resources feature practice tests mirroring the actual exam format, covering road rules, traffic signs, and driving practices. Updated regularly, these PDFs ensure candidates access the most accurate and relevant information. Additionally, free and paid versions are available, catering to different learning needs. They are widely regarded as essential tools for effective preparation and achieving success in the G1 written test.

Practice Tests and Quizzes in Punjabi

Practice tests and quizzes in Punjabi are widely available, offering multiple-choice questions similar to the actual G1 written test. These resources help improve knowledge retention and boost confidence, ensuring a better understanding of Ontario’s road rules and signs. Many are free and accessible online, making preparation convenient for Punjabi-speaking candidates. Regular practice with these tools significantly enhances readiness for the exam.

Where to Find Practice Tests Online

Practice tests for the Ontario G1 written test in Punjabi are readily available online. Official government websites, such as the Ontario government website and DriveTest.ca, provide authentic resources. Additionally, third-party platforms like PunjabiG1Test.com and driving test prep apps offer free and paid practice materials. YouTube channels and educational websites also host quizzes and video tutorials in Punjabi. These resources are designed to simulate the actual test experience, ensuring candidates are well-prepared. Regular updates and new questions keep the content relevant and effective for learners.

How to Use Quizzes Effectively

Quizzes are an excellent tool for preparing for the Ontario G1 written test in Punjabi. Start by identifying weak areas through regular practice. Take timed quizzes to simulate real test conditions, ensuring you manage your time wisely. Review answers thoroughly to understand mistakes and improve knowledge retention. Focus on high-scoring sections like road signs and traffic rules. Use online platforms and apps to access quizzes anytime, anywhere. Track progress to stay motivated and adjust study strategies as needed. Consistent quiz practice builds confidence and ensures readiness for the actual test.

Tips for Effective Preparation

Focus on weak areas identified through practice tests. Use PDF study guides and Punjabi resources to review road signs and rules. Practice regularly with timed quizzes to improve accuracy and speed. Understand the test format beforehand to reduce anxiety. Review answers thoroughly to avoid repeating mistakes. Stay consistent and track progress to build confidence for the Ontario G1 written test.

Understanding the Test Format

The Ontario G1 written test consists of 40 multiple-choice questions, divided into two sections: 20 on road signs and 20 on driving rules. To pass, you must answer at least 16 questions correctly in each section. The test is available in Punjabi, ensuring language accessibility. Questions are designed to assess knowledge of traffic laws, safe driving practices, and road signs. Familiarize yourself with the format by reviewing PDF resources and practice tests, which mirror the actual exam structure. This preparation helps build confidence and reduces test-day anxiety.

Time Management and Study Strategies

Effective time management is crucial for success in the Ontario G1 written test. Allocate dedicated study sessions to review road signs and driving rules. Utilize PDF resources with answers in Punjabi to practice questions and track progress. Set a study schedule, focusing on weak areas identified through practice tests. Simulate exam conditions by timing yourself during practice sessions. Review incorrect answers to improve understanding. Consistent practice ensures familiarity with the test format and boosts confidence. Prioritize quality study time over rushed sessions for better retention and exam readiness.

Accessing the Test and Study Materials

Access Ontario G1 written test materials in Punjabi through official websites and resources. Download PDF guides with answers and practice tests for effective preparation. Utilize online platforms for easy access to updated study materials.

Official Websites and Resources

To access the Ontario G1 written test in Punjabi, visit official websites like DriveTest.ca or Ontario.ca. These platforms provide free PDF resources, including practice tests and answer keys. Additionally, third-party websites offer Punjabi-specific study materials, such as G1 practice tests and guides. These resources are designed to help candidates prepare efficiently. Ensure to download the most recent versions, as they are regularly updated to reflect current road rules and signs. Utilizing these official sources guarantees access to accurate and comprehensive study materials in Punjabi.

Downloading PDFs and Guides

Accessing Ontario G1 written test PDFs in Punjabi is straightforward. Visit official websites like DriveTest.ca or Ontario.ca to download free study materials. These PDFs include practice tests, answer keys, and detailed guides. Third-party platforms also offer Punjabi-specific resources, such as G1 practice tests and road sign handbooks. Ensure to download the latest versions, as they are updated regularly. These resources are designed to help you prepare efficiently for the test, covering rules, signs, and driving practices in Punjabi. Downloading these guides is a great way to enhance your study routine.

Success Stories and Testimonials

Candidates who prepared using Punjabi PDFs and practice tests shared their success stories. Many passed the G1 test on their first attempt, crediting the clear, Punjabi-language materials. “The PDF guides made complex rules easy to understand,” said one candidate. Others highlighted how the structured format boosted their confidence. These testimonials prove that preparing in Punjabi significantly enhances success rates for new drivers.

Experiences of Candidates Who Passed

Candidates who successfully passed the Ontario G1 test shared their positive experiences. Many credited Punjabi PDF study materials and practice tests for their success. They found the clear explanations and familiar language made complex rules easier to understand. Several mentioned that the structured format of the PDF guides helped them grasp traffic signs and driving regulations effectively. This resonates with feedback from others who appreciated the convenience of practicing in their native language, which boosted their confidence and reduced anxiety during the actual test.

How Preparation in Punjabi Helped

Preparing for the Ontario G1 test in Punjabi significantly eased the learning process for many candidates. The availability of PDF resources and practice tests in their native language reduced confusion and improved comprehension of complex traffic rules. Candidates appreciated the clear explanations and familiar terminology, which made studying more efficient. This approach also boosted confidence, as understanding the material in Punjabi minimized language barriers and allowed for better focus on the content itself. Many credited this tailored preparation for their ability to perform well and pass the test successfully.